I thought it might be interesting to talk about how a portrait is made. I've learned a few ways to do it – the most fun way for me is from life, no drawing first – go straight to paint. This is also a dangerous way – you're gambling that the drawing will be right, first shot out. Sometimes I'm in the zone and this works, but usually half way through I realize there is something slightly wonky with it. At that point you have to adjust the paint, which with oils can get muddy, or live with the error. Now that I'm painting pictures for other people, accuracy is more important. The traditional method for a portrait is to make a drawing first, then transfer to canvas, do an underpainting, then the finished paint. I learned this method, but find it a little tedious. (I'm super impatient!) So, I kind of cheat between the two methods... I make a drawing first to get most of my mistakes out of the way. I'm also using photos for the first time since high school (the purest in me calls it cheating!!). Second, I transfer the drawing to canvas so when I'm painting I only have to worry about tone and color. The next step is to block in the main areas of light and shade and then start to add the details. One of my favorite instructors in college used to always say 'work from the general to the specific' over and over and it's been good advice.
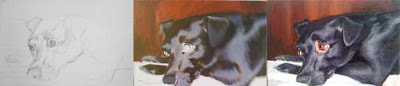

This cute pup is Harleigh. She belongs to a friend of mine. I understand she's a bit of a neurotic pup that recently went through some training to help socialize her. She's learning that strangers are not the enemy, and to not be overly fearful of them. I hope to meet her soon, and will try and make friends...It won't hurt to stuff my pockets with treats to bribe her though ;-)


No comments:
Post a Comment